Archive for the ‘Food and Recipes’ Category

Fabulous Pets in Our Kitchen

Saturday, March 24th, 2007

Finally we have some more livestock here on the Farmlet. These are not cows or goats, but colonies of bacteria and yeasts. They live in the kitchen, and I like to call them our “pets.”

We now have starters for kombucha, water kefir, kefir, and Caspian Sea yogurt. My sister and her partner were kind enough to transport them here for us when they traveled up from Wellington. They must have transported the pets with great care, as all arrived in good shape. They have settled well into their new home!

Here’s an introduction to the new pets, along with links for those who are curious:

For those who don’t know about kombucha, it’s a colony of yeasts and bacteria that form a slimy pancake-like mass known as a “scoby,” a “mother,” or a “mushroom.” The scoby will transform a container of sweet tea into a delicious sweet and sour beverage, which reputedly has great health-giving properties. The colony produces a new scoby with each batch, so you soon get plenty to give away to friends. My Dad took one look at the scoby and declared he’d be a bit concerned if he found one of those in his fridge. It certainly looks pretty dodgy!
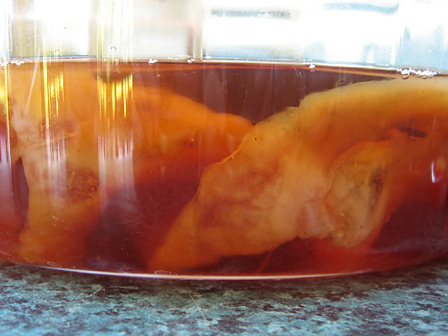

Kombucha

Water kefir are clear crystal-like grains that will culture sugar water (with other ingredients added) into a fizzy, refreshing beverage. We’ve been adding lemon, raisins, and various herbs from the garden.


Water kefir

Kefir (milk kefir) are opaque grains that will culture milk at room temperature. We have been using the resulting kefir to make smoothies. I’m also keen to try making some kefir cheese.

And what about Caspian Sea Yogurt? It is a special yogurt that cultures at room temperature. Instead of heating the milk and keeping it at above room temperature to culture, this culture can just be stirred into raw milk at room temperature and left to thicken. It takes about 8-12 hours. The resulting yogurt is mild and creamy, with a stringier texture than regular yogurt. It’s really easy to make, and Kevin and I find it extremely tasty. Until a couple of weeks ago, I never knew there was such an easy way to make raw milk yogurt.

We are having a lot of fun playing around with all these new livestock. If any readers live nearby and would like to have some starters, please let us know. We’d be delighted to share.

Tomato Adventure

Friday, March 16th, 2007

Finally, here is the update on my tomato preserving adventures. As a novice preserver, I’m pleased (relieved, even) to report that the tomato canning exercise seems to have been a success. Special thanks are due to Mum and Auntie Linda and that trusty Kiwi classic, the Edmond’s Cookery Book!


Preserved tomatoes

To date, I have canned seven quarts of tomato puree in glass preserving jars with dome seals, using the “overflow method.” These 7 jars are the result of boiling down some 14 kilos of tomatoes.

This is what I did:

*Cut up the tomatoes with skins still on, and made a puree using a stick blender.
*Filled a large stock pot with the puree, and simmered it for a couple of hours to reduce.
*Added a little salt.
*Heated the preserving jars in a 120 degrees celsius oven for 30 minutes.
*Put the seals in boiling water for 5 minutes.
*Took hot jars out of the oven one at a time to be filled with hot puree and sealed.
*Added 1/2t of citric acid to each jar to ensure sufficient acidity to inhibit growth of bacteria.
*Filled each jar to the very top (almost overflowing).
*Placed hot seal on top of jar, using tongs.
*Wiped off any excess juice, and fixed the seal in place with a screw band.
*Checked the jars after 12 hours of cooling to see if they had sealed properly.
*Removed screw bands and labelled the jars.

I’m sure we will value the taste that the tomatoes will add to our winter fare. Since sun drying (and even storing dehydrated products) can be problematic here due to the high humidity, and freezing uses so much energy, canning some puree seems like a good way for us to preserve our tomatoes. Fortunately, canned tomatoes do not require added sugar for successful preservation. We opted not to add other ingredients to the puree, in order to keep it as simple and versatile as possible.

There is so much going on here at the moment, and lots of posts I’d like to write for the Farmlet website. My brother and sister were visiting here for about ten days, so we took lots of time out to have fun with the family. We had a wonderful time, and I miss my brother and sister now that they are gone. Still, it’s good to be getting back to the regular work schedule around the Farmlet — not to mention a more regular blogging schedule!

Tasty Little Morsels from the Garden

Monday, February 26th, 2007

As well as growing our own vegetables here on the Farmlet, we are hoping that we’ll eventually be able to grow a lot of the seasonings we use on our food. The first step in this direction has been to plant a variety of culinary herbs. We are also keen to grow as many spices as we can. Today I spent some time harvesting coriander and celery seeds. I’ll save some of the coriander for planting, but mostly those seeds are to be kept to fill our spice jars.


Coriander seed pods

In the future, we hope to try growing and harvesting other spices: fennel seed, caraway, fenugreek, cumin, mustard and possibly even saffron, though I’m not sure how it would do here. We are also enjoying the spicy flavours of jalapeño, cayenne and Thai chili peppers in our late summer meals.


Jalapeño and cayenne chili peppers

I picked a bowl of nasturtium seeds a couple of days ago to make nasturtium seed “capers.” They are a lactic acid pickle, the recipe for which I found in Sandor Ellix Katz’s book, Wild Fermentation. The recipe worked really well, and the nasturtium seeds do end up tasting very like capers! Wild Fermentation is a fantastic book with lots of exciting recipes in it. I recommend it for anyone who’d like to explore the delicious and health-giving world of fermented food. The recipe instructions are clearly written, and I love the fact that they are interspersed with anecdotes featuring Katz’s colourful collection of friends. There is even an anecdote about milking goats. This is my kind of recipe book! I tried out Katz’s recipe for “sour beet pickle” today with the first of the beets harvested from the garden. Can’t wait for it to ripen so that we can taste it! Perhaps by next Autumn we’ll be growing our own caraway seeds for making sour beet pickle.

Delicious Fruit Bounty

Friday, February 2nd, 2007

The summer is bringing a bounty of fruit. Since we have only just started our perennial fruit plantings here on the Farmlet, we are lucky to have family members nearby who are willing to share theirs with us.

This year, the plum tree in my parents’ garden was laden with so many tasty red plums that it’s a wonder none of the branches broke under the weight. They were very generous about allowing us to help relieve the tree of its burden. Believe me, we were more than happy to lighten the load for that poor tree! We turned some of the plums into a large ruby-red batch of lacto-fermented plum chutney — some for us and some for my parents. (We more-or-less followed the recipe in Nourishing Traditions for lacto-fermented “fruit chutney.”) It turns out that Kevin is not so crazy about the plum chutney, but I love to eat it on meat — especially on lamb chops.


Blackberries

Some relatives of mine have a large patch of fat juicy blackberries growing on their farm. They were kind enough to invite us over to pick all we wanted. Kevin and I spent an enjoyable evening picking berries, later aided by a kind auntie. We came home with more than two buckets full of delicious berries. We have been gobbling berries ever since, and have also manufactured a jam-like substance out of a good many of them. I like the jam sour, but it looks like we’ll have to add more honey before Kevin will be able to enjoy it on his toast.

Yogurt, Butter and Cheese!

Tuesday, January 23rd, 2007

Since a while before Christmas, we have been making our own yogurt, butter and cheese here on the Farmlet. With a litre of top quality organic yogurt costing NZ$5.00 and upwards at the supermarket, it makes good economic sense to obtain beautiful creamy milk and make our own yogurt from it. We do not make all our own butter or cheese yet. We make as much butter as we can with the cream skimmed off the top of our six litres per week of creamy Jersey milk. We are getting a lot of satisfaction from doing these things ourselves, and it is good practice for the day when we finally milk our own cows.


Whole, raw milk (Yes, the container is nearly half full of cream)

I’d never made yogurt before, and have been amazed to find how easy it is. This is the method we use:

Heat one quart (one litre) of milk until bubbly but not yet boiling. Take it off the heat and pour it into a shallow container. Cool it until it’s not too hot to hold your finger in it for a few seconds, then stir in a generous tablespoon of yogurt (from your last batch, or a plain commercial yogurt with live cultures). Cover the container, and put it somewhere warm. The aim is to keep it at above body temperature while the cultures grow. We do this by putting it on top of the hot water cylander. It takes about eight hours for the yogurt to set up.

These instructions are not very scientific, but we do end up with tasty yogurt! Experienced yogurt-makers might have better advice than this. Admittedly, out yogurt does not seem to keep as well as the kinds I used buy from the supermarket. Maybe that’s because we are not very careful about regulating the temperature during the process. . . ?

When I was a child, we used to enjoy helping our grandparents make butter out of the cream from their house cow’s milk. They had a big butter churn. Here on the Farmlet, we just put the cream in a jar and shake it until it turns into butter. My grandparents used to have special wooden butter pats for squeezing the buttermilk out of the butter. Kevin and I just rinse it and squeeze it by hand or with a wooden spoon. Butter is one of Kevin’s favourite foods, but he’d never made it before. The first time he saw the golden curds of butter separate from the buttermilk in the jar he was shaking, his face lit up and he let out a yelp of delight. He could hardly believe how easy it was to bring about the magical transformation of cream into butter.


It is like magic; no, it is magic

A lump of creamy goodness is born

Pat out the extra buttermilk

We make a simple (not aged) farmer cheese out of the buttermilk from the butter making, by heating it to almost boiling and curdling it with vinegar (2 tablespoons of vinegar to 1 quart of milk and/or buttermilk).


Balsamic vinaigrette, tomatoes, basil and lots of soft, white cheese

Once it curdles, take it off the heat, and drain it through a strainer lined with cloth. You can add salt to the curds at this stage if you like. This soft white cheese is good in curry, or served with balsamic vinaigrette, tomatoes and basil.